

Homemade Cat Treats: Top 5 Nutritious and Healthy Snacks
There’s something deeply satisfying about watching your cat’s eyes light up when you offer them a special treat. As cat parents, we want to give our feline companions the very best, and that includes knowing exactly what goes into the snacks they eat. This is precisely why homemade cat treats have become such a beloved practice among devoted cat owners like myself.
Table of Contents
I remember the first time I made treats for my own cat—there was an undeniable joy in seeing her eagerly devour something I’d crafted with my own hands, using ingredients I could actually pronounce. No mysterious additives, no questionable preservatives, just wholesome, cat-safe foods prepared with love.
In this comprehensive guide, we’ll explore everything you need to know about creating healthy cat snacks at home. From understanding crucial safety guidelines to following five delicious, vet-approved recipes, you’ll have all the tools you need to become your cat’s favorite chef. Whether you’re looking for DIY cat treats to use as training rewards or simply want to spoil your furry friend with natural cat rewards, this article has you covered.
Are Homemade Cat Treats Safe for My Cat?
Yes, homemade cat treats are safe when prepared correctly using cat-appropriate ingredients. The key is avoiding toxic foods like onions, garlic, and excessive salt, while sticking to simple, whole-food ingredients. Unlike commercial treats that may contain fillers and artificial additives, DIY treats give you complete control over what your cat consumes. Always introduce new treats gradually and consult your veterinarian if your cat has specific health conditions.
Why Choose Homemade Cat Treats Over Store-Bought Options?
When we walk down the pet food aisle, we’re often overwhelmed by flashy packaging promising the healthiest, most delicious treats for our cats. But have you ever flipped those packages over and actually read the ingredient lists? I certainly have, and what I found made me uncomfortable—artificial colors, mysterious “meat by-products,” and ingredients I couldn’t identify without a chemistry degree.
Creating healthy cat snacks at home offers numerous benefits that simply can’t be matched by mass-produced alternatives.
Complete Ingredient Transparency
The most significant advantage of making DIY cat treats is knowing precisely what your cat is eating. There are no hidden ingredients, no undisclosed additives, and no surprises. Every component is something you’ve selected, measured, and prepared yourself.
Allergen Control
Many cats suffer from food sensitivities or allergies, with common culprits including certain proteins, grains, or additives found in commercial products. When you prepare treats at home, you can eliminate any ingredient that triggers a reaction in your cat. This level of customization is simply impossible with pre-packaged options.
Cost-Effectiveness
While premium commercial treats can be surprisingly expensive, homemade alternatives often use simple ingredients you may already have in your kitchen. A single batch of homemade treats can last weeks when stored properly, making them a budget-friendly choice for cat parents.
Freshness and Quality
Store-bought treats sit on shelves for months, requiring preservatives to maintain their stability. Home-prepared snacks are fresh, and you control exactly when they’re made and how they’re stored.
Understanding the Essential Safety Rules for Cat Treats
Before we dive into recipes, we need to establish some non-negotiable safety guidelines. Cats have unique nutritional requirements and metabolic systems that differ significantly from humans and even from dogs. What’s safe for us—or our canine companions—can sometimes be dangerous or even fatal for cats.
The Critical 10% Rule
This is perhaps the most important guideline to remember: treats should never exceed 10% of your cat’s total daily caloric intake. This rule exists for good reason. An average indoor cat requires approximately 200 to 300 calories per day, depending on their size, age, and activity level. This means treats should account for only 20 to 30 calories daily.
Exceeding this threshold regularly can lead to nutritional imbalances, as treats—no matter how healthy—are not formulated to meet a cat’s complete nutritional needs. More importantly, over-treating is a direct path to feline obesity, which is associated with diabetes, joint problems, heart disease, and a shortened lifespan.
Foods That Are Toxic to Cats
Certain foods are strictly off-limits when preparing any cat food or treats. These include onions and garlic, which contain compounds that damage red blood cells and can cause life-threatening anemia even in small amounts. Chives and leeks belong to the same family and pose identical risks.
Grapes and raisins can cause acute kidney failure in cats, though the exact toxic mechanism remains unclear to researchers. Chocolate contains theobromine and caffeine, both of which are dangerous for cats. Xylitol, an artificial sweetener found in many sugar-free products, causes dangerous drops in blood sugar and potential liver failure.
Alcohol, caffeine, raw dough containing yeast, and macadamia nuts should also never be given to cats under any circumstances.
The No-Seasoning Rule
This cannot be emphasized enough: never add salt, pepper, garlic powder, onion powder, or any other seasonings to cat treats. I know it might seem bland to us, but cats don’t need or appreciate these additions the way humans do. Their taste buds and nutritional requirements are completely different from ours. Plain, unseasoned ingredients are exactly what they need.
Excessive sodium can lead to salt poisoning, causing symptoms ranging from vomiting and diarrhea to tremors, seizures, and even death in severe cases.
Special Health Considerations
If your cat has been diagnosed with pancreatitis, you must be especially careful with fat content. High-fat treats can trigger painful and potentially dangerous flare-ups. Stick to lean proteins and avoid adding any oils or fats to recipes.
Cats with kidney disease require careful management of phosphorus and protein intake, so always consult your veterinarian before introducing any new treats.
Diabetic cats need treats with minimal carbohydrates, and timing treat-giving around insulin administration may be important.
Can Cats Be Allergic to Homemade Treats?
Absolutely, yes. Just like humans, cats can develop allergies to various foods, and interestingly, some of the most common allergens are ingredients we might consider perfectly healthy.
Chicken is actually one of the more common food allergens in cats, despite being a staple protein in most cat foods. Fish, particularly certain species, can also trigger allergic reactions. Beef and dairy products are other frequent culprits.
Signs of a food allergy in cats include itchy skin (especially around the head and neck), digestive upset, vomiting, diarrhea, and excessive grooming. If you notice any of these symptoms after introducing a new treat, discontinue feeding it immediately and consult your veterinarian.
When trying any new treat—homemade or otherwise—I always recommend introducing it in very small amounts first and observing your cat for 24 to 48 hours for any adverse reactions.
Understanding the Difference: Treats vs. Complete Meals
This distinction is crucial and worth emphasizing clearly. The recipes in this article are for complementary treats and snacks only—they are not complete and balanced meals.
Cats are obligate carnivores with very specific nutritional requirements. A complete cat meal must contain appropriate levels of protein, fat, taurine (an essential amino acid cats cannot synthesize themselves), vitamins, minerals, and other nutrients in precise ratios. Formulating a complete and balanced homemade diet requires careful calculation, often veterinary nutritionist consultation, and typically the addition of specific supplements.
The treats we’re making here are designed to be occasional rewards and snacks, given in addition to your cat’s regular, nutritionally complete diet. They’re meant to supplement happiness, not replace proper nutrition.
Think of these treats the way you might think of a cookie or piece of fruit for yourself—enjoyable extras, not meal replacements.
The Top 5 Homemade Cat Treats: Delicious, Safe, and Simple Recipes
Now we’ve arrived at the heart of this article: five carefully crafted, veterinary-guideline-compliant recipes that your cat will adore. I’ve designed these natural cat rewards to be simple enough for beginners while offering variety in texture, flavor, and preparation method.
Each recipe uses only ingredients verified as safe for feline consumption. I’ve intentionally kept ingredient lists short and accessible—no exotic supplements or hard-to-find items required.
Important Disclaimer: These recipes create complementary snacks intended to be fed in moderation alongside a complete and balanced cat food. They are not meal replacements. Always follow the 10% rule for treats, and consult your veterinarian before introducing new foods if your cat has any health conditions.
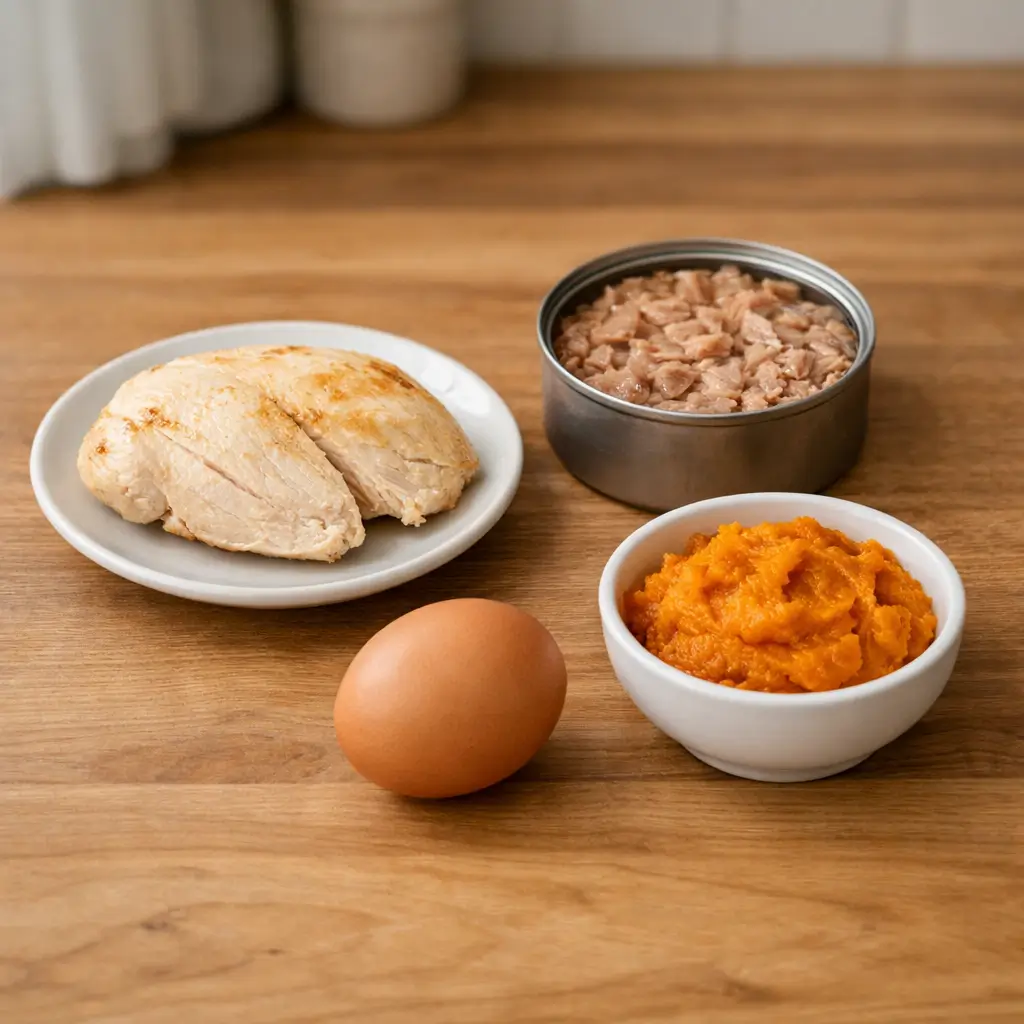
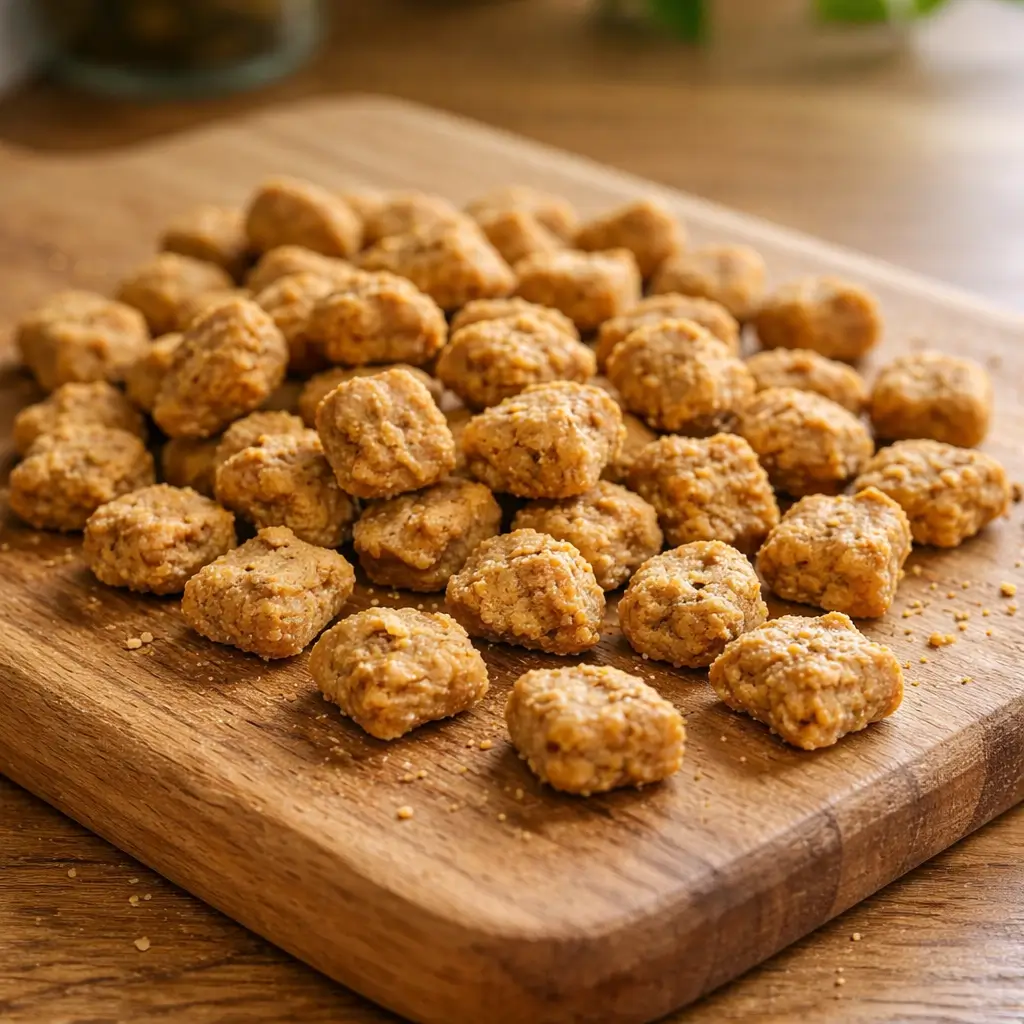
Recipe 1: Whisker-Licking Tuna Crunchers (Crunchy Biscuit)
These crispy little biscuits are perfect for cats who love that satisfying crunch. The aroma of tuna baking in the oven is irresistible to most felines, and you’ll likely have a curious audience gathering in your kitchen as these treats come together.
Ingredients:
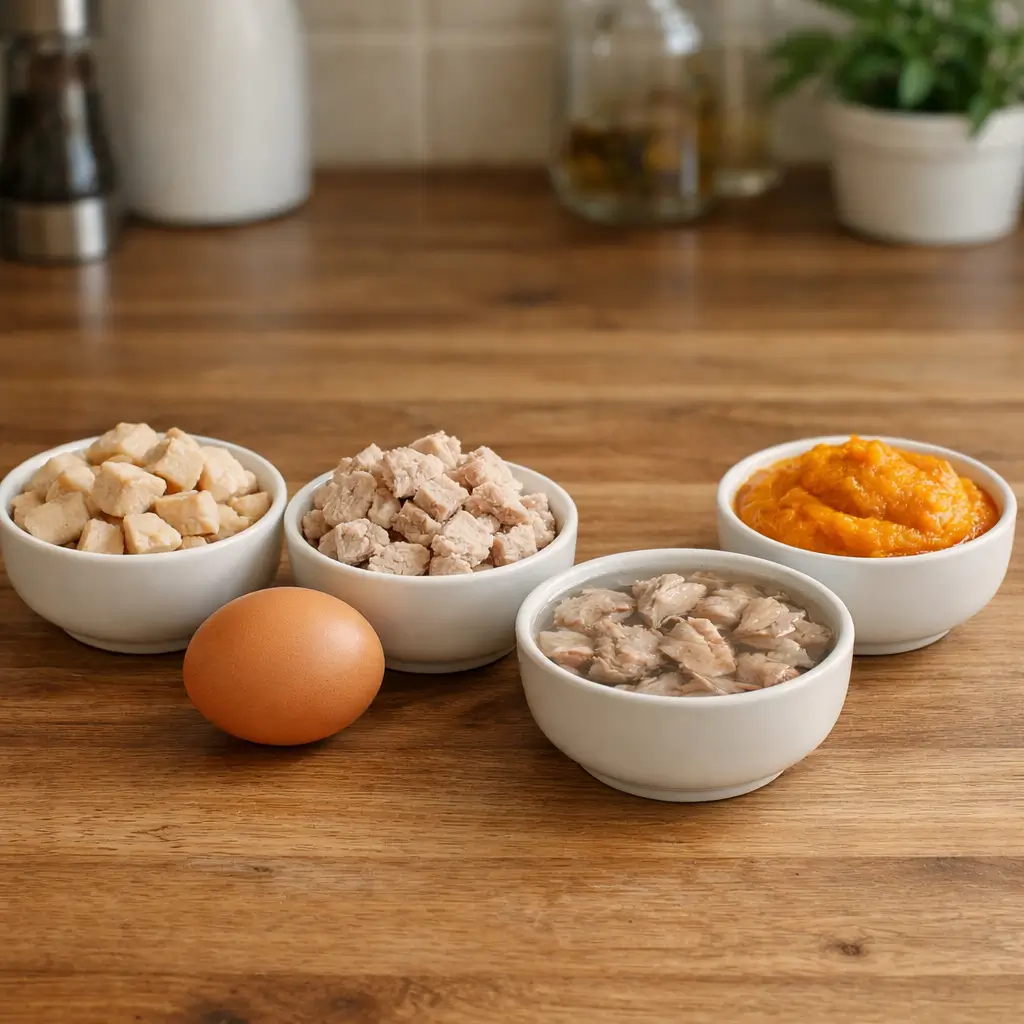
- 1 can (5 ounces) of tuna in water, drained
- 1 cup oat flour (or finely ground oats)
- 1 large egg
- 1 tablespoon water (if needed for consistency)
Preparation Steps:
Begin by preheating your oven to 350°F (175°C). Line a baking sheet with parchment paper for easy cleanup.
Drain the tuna thoroughly, pressing out as much liquid as possible. Place the drained tuna in a mixing bowl and use a fork to break it into very fine pieces. The finer the texture, the better your treats will hold together.
Add the oat flour and egg to the bowl with the tuna. Mix everything together until you have a uniform dough. If the mixture seems too dry and crumbly, add water one teaspoon at a time until it becomes workable. If it’s too sticky, add a bit more oat flour.
Roll the dough into small balls, approximately half an inch in diameter—about the size of a marble. Place them on your prepared baking sheet, leaving about an inch between each one. Use the back of a fork to gently flatten each ball into a small disk.
Bake for 12 to 15 minutes, or until the edges turn golden brown and the treats feel firm to the touch. They will crisp up more as they cool, so don’t worry if they seem slightly soft when you first remove them.
Allow the treats to cool completely on the baking sheet before offering them to your cat.
Storage Instructions:
Store these crunchy treats in an airtight container in the refrigerator for up to one week. To extend their shelf life, you can place the treats in a freezer-friendly bag or sealed container and freeze them for up to three months. Just be sure to let them defrost on the counter until they reach room temperature before giving them to your cat.
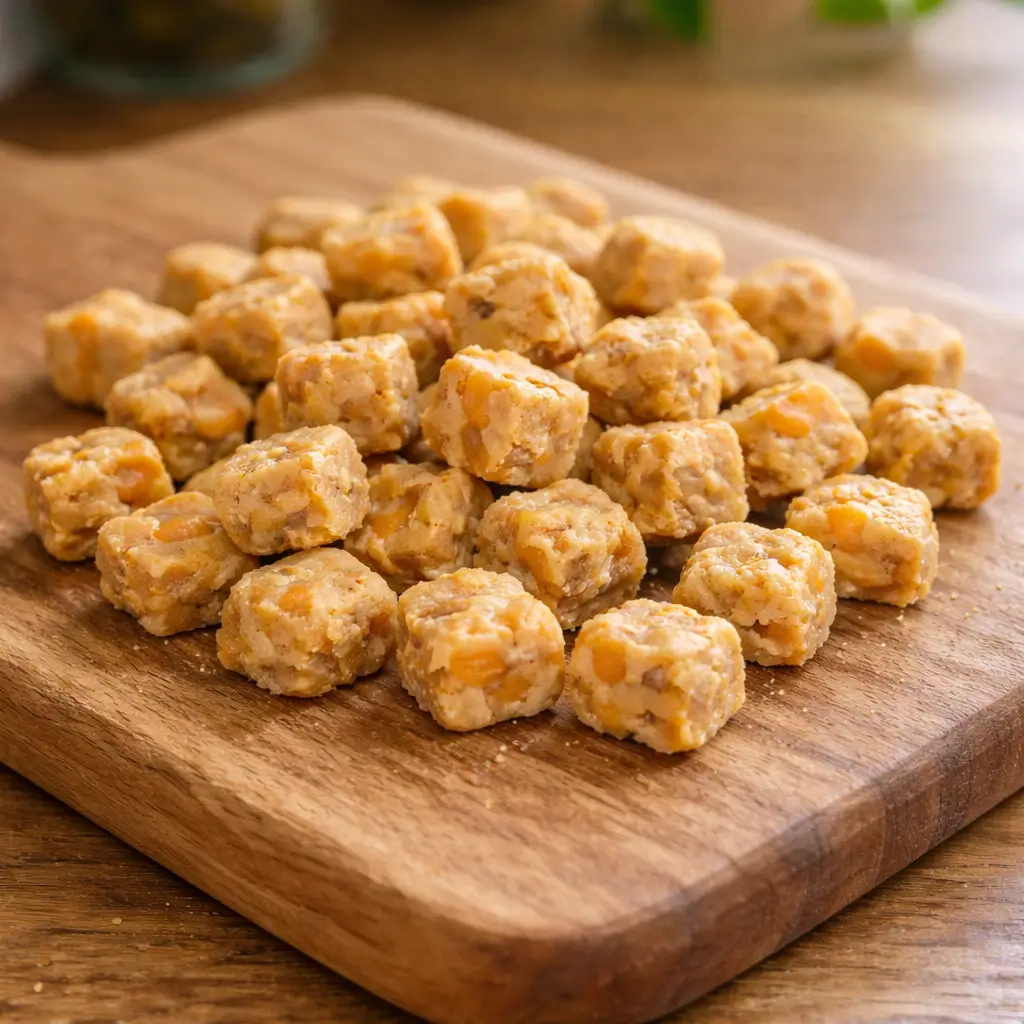
Recipe 2: Purrfect Chicken Morsels (Soft Meat Treat)
These tender, meaty bites are ideal for older cats, cats with dental issues, or simply those who prefer a softer texture. The combination of chicken and pumpkin creates a treat that’s both delicious and gentle on the digestive system.
Ingredients:
- 1/2 cup cooked chicken breast, finely minced (plain, unseasoned, boneless, skinless)
- 2 tablespoons pure pumpkin puree (plain, not pie filling)
- 1 egg yolk
Preparation Steps:
Set your oven temperature to 325°F (165°C) and prepare a baking tray by covering it with parchment paper.
Ensure your chicken is thoroughly cooked with no pink remaining, then mince it as finely as possible. A food processor can help achieve a very fine, almost paste-like consistency, which works best for this recipe.
In a bowl, combine the minced chicken, pumpkin puree, and egg yolk. Stir the mixture well to ensure all the ingredients are fully combined and blended together.
Using a small spoon or your hands, form the mixture into tiny meatballs about the size of a pea or small marble. Place them on your prepared baking sheet.
Bake for 10 to 12 minutes until the treats are cooked through but still soft. These are meant to remain tender, so avoid overbaking.
Let the treats cool to room temperature before serving to your cat.
Storage Instructions:
Keep these soft treats in an airtight container in the refrigerator for up to five days. They can be frozen for up to two months. When serving from frozen, thaw completely and bring to room temperature—cold treats from the refrigerator are fine, but frozen ones should be defrosted first.
Recipe 3: Arctic Salmon Popsicles (Frozen Treat)
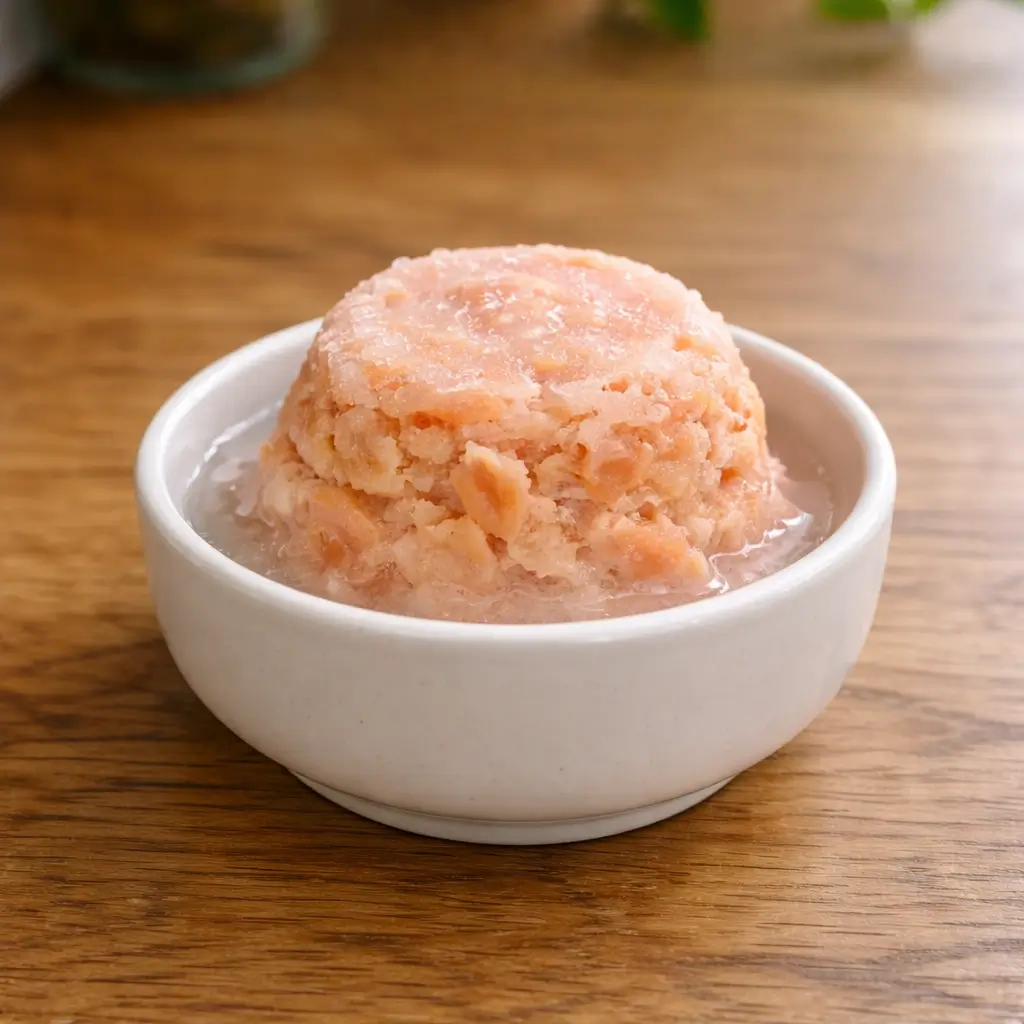
When summer arrives or you simply want to offer your cat something refreshingly different, these frozen treats are absolutely delightful. They’re incredibly simple to make and provide a fun way to keep your cat engaged while also helping with hydration.
Ingredients:
- 1/2 cup canned salmon in water, drained and mashed
- 1/2 cup water or low-sodium chicken broth (ensure broth contains no onion or garlic)
Preparation Steps:
Drain the salmon and place it in a blender or food processor. Add the water or chicken broth and blend until smooth. You want a consistency similar to a thin smoothie—completely lump-free.
If you don’t have a blender, mash the salmon as thoroughly as possible with a fork, then whisk in the liquid until relatively smooth.
Pour the mixture into an ice cube tray, filling each compartment about three-quarters full. Small silicone molds work wonderfully for this purpose—look for molds that create bite-sized portions appropriate for cats.
Place the tray in the freezer and freeze for at least four hours, or until completely solid.
To serve, pop out one frozen treat and place it in a shallow dish or on a lick mat. Supervise your cat initially to ensure they enjoy licking rather than trying to swallow the treat whole.
Storage Instructions:
Once frozen solid, you can transfer the treats to a freezer-safe bag or container for more convenient storage. They will keep in the freezer for up to three months. Always supervise your cat with frozen treats, especially the first few times.
Recipe 4: Turkey Jerky Strips (Dehydrated Treat)

These chewy strips satisfy your cat’s primal desire to tear into meat while providing a high-protein, low-fat snack. The dehydration process concentrates the flavor, making these treats incredibly enticing.
Ingredients:
- 1/2 pound turkey breast, fresh and boneless (not deli meat, which contains sodium and additives)
Preparation Steps:
If you have a food dehydrator, this recipe is straightforward. If not, you can achieve excellent results using your oven at a very low temperature.
Place the turkey breast in the freezer for 30 to 45 minutes until it becomes firm but not frozen solid. This makes slicing much easier.
Using a sharp knife, slice the partially frozen turkey against the grain into thin strips, approximately 1/8 to 1/4 inch thick. Thinner strips will result in crispier jerky, while slightly thicker ones will be chewier.
For oven preparation, preheat your oven to its lowest setting, ideally 170°F (75°C) or as low as it will go. Arrange the turkey strips in a single layer on a wire rack set over a baking sheet. This allows air to circulate around all sides.
Prop the oven door open slightly with a wooden spoon to allow moisture to escape. Dehydrate for 3 to 4 hours, flipping the strips halfway through. The jerky is done when it’s completely dry and slightly flexible but not crispy or brittle.
For dehydrator preparation, arrange strips on dehydrator trays and follow your machine’s instructions for meat, typically requiring 4 to 6 hours at 155°F to 165°F (68°C to 74°C).
Allow the jerky to cool completely before breaking into appropriately sized pieces for your cat.
Storage Instructions:
Store in an airtight container in the refrigerator for up to two weeks or freeze for up to four months. Because these treats contain no preservatives, refrigeration is essential for freshness and safety.
Recipe 5: Egg-cellent Breakfast Bites (Simple Cooked Treat)

Sometimes the simplest treats are the most appreciated. These protein-rich bites come together in minutes and make use of humble eggs—a safe and nutritious food for cats when properly cooked.
Ingredients:
- 2 large eggs
- 1 tablespoon finely minced cooked chicken or turkey (optional, for added appeal)
Preparation Steps:
Crack the eggs into a bowl and whisk thoroughly until the yolks and whites are completely combined. If using the optional meat, stir it into the egg mixture.
Heat a non-stick pan over medium-low heat. You don’t need any oil or butter—the non-stick surface will prevent sticking without added fats.
Pour the egg mixture into the pan and cook gently, stirring frequently with a spatula. You’re essentially making scrambled eggs, but you want to cook them more thoroughly than you might for human consumption. Continue cooking until the eggs are completely set throughout with no runny or wet areas.
Remove from heat and allow to cool completely. Once cooled, break or cut the scrambled eggs into small, bite-sized pieces appropriate for your cat.
Storage Instructions:
Store these treats in an airtight container in the refrigerator for up to three days. They do not freeze well, as the texture becomes rubbery upon thawing. Make small batches frequently for best quality.
Tips for Successfully Making DIY Cat Treats
Over my years of preparing safe human food for cats, I’ve gathered some practical wisdom that can help ensure your treat-making adventures are successful.
Start Small
When trying a new recipe, make a small test batch first. This way, if your cat turns up their nose at your creation (and they absolutely might—cats are notoriously particular), you haven’t wasted significant ingredients or time.
Observe Your Cat’s Preferences
Pay attention to what textures and flavors your individual cat prefers. Some cats go wild for fish while remaining utterly indifferent to poultry. Others prefer crunchy textures over soft ones. Tailoring your homemade cat treats to your specific cat’s preferences increases the likelihood of success.
Measure Portions Carefully
Remember that treats should remain treats. I find it helpful to portion out my cat’s daily treat allowance at the beginning of each day. This prevents accidental overfeeding, especially in households where multiple family members might be offering snacks.
Keep a Treat Journal
If your cat has any sensitivities, consider keeping a simple log of what treats you’ve made, what ingredients you used, and how your cat responded. This becomes invaluable if any issues arise and you need to identify potential problem ingredients.
Prioritize Freshness
Because homemade treats lack preservatives, they require proper storage and timely use. Always check for signs of spoilage before offering stored treats to your cat.
Frequently Asked Questions About Homemade Cat Treats
How often can I give my cat homemade treats?
You can offer treats daily, but remember to follow the 10% rule. For most cats, this means just a few small treats per day, depending on the calorie content of the specific recipe and your cat’s overall dietary needs.
Can kittens eat these homemade treats?
Kittens over 12 weeks old can generally enjoy these treats in very small amounts. However, kittens have higher nutritional demands for growth, so their primary diet should consist of kitten-formulated complete food. Treats should be an occasional addition only.
What if my cat doesn’t like the treats I made?
Cats are individuals with distinct preferences. If your cat rejects a treat, try a different recipe with different protein sources or textures. Some cats need multiple exposures to new foods before accepting them, so consider offering small tastes over several days before giving up entirely.
Can I substitute ingredients in these recipes?
Within reason, yes. You can typically substitute similar proteins—for example, using chicken instead of turkey in the jerky recipe. However, always verify that any substitute ingredient is safe for cats before using it.

Conclusion: The Joy of Homemade Cat Treats
Creating homemade cat treats is more than just a way to provide healthy snacks—it’s an expression of love for our feline family members. When we take the time to prepare DIY cat treats using safe, wholesome ingredients, we’re making a conscious choice to prioritize our cats’ health and happiness.
Throughout this guide, we’ve explored the importance of safety guidelines, understood the critical difference between treats and complete meals, and walked through five delicious recipes that your cat is sure to appreciate. From crunchy tuna biscuits to refreshing frozen salmon popsicles, these natural cat rewards offer variety, nutrition, and the peace of mind that comes from knowing exactly what your cat is eating.
Remember, the key to successful treat-giving lies in moderation, safety awareness, and paying attention to your individual cat’s needs and preferences. Always consult your veterinarian if you have concerns about your cat’s diet or if they have existing health conditions.
I encourage you to try these recipes, experiment within safe boundaries, and enjoy the wonderful experience of watching your beloved cat savor something you’ve made with your own hands. There’s truly nothing quite like it.
Happy treating, and may your cat’s whiskers always twitch with anticipation when they see you heading to the kitchen.